|
The Basics:
Cross stitches are created on fabrics that are woven in such a way that the stitches can be made in a regular fashion,
almost as if the fabric threads form a grid. There are two basic kinds of fabric: Aida cloth, and evenweave (fabrics where
the thread weave is even or equal in both directions) fabrics.
Making a stitch on Aida cloth
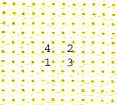
Aida cloth is a fabric weave constructed in small "blocks" of fabric with holes between the "blocks."The holes in
the fabric create a self-made guide for placing your needle! Come up through the hole on the bottom left side of the "block"
where you wish to place your stitch. Go back through the fabric on the upper right hole.
| Aida cloth with holes numbered. |

|
| Here's how to make a simple cross stitch on Aida: |

|
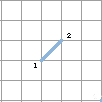
Step 1: Bring threaded needle up through fabric at 1, insert needle at 2 and bring
through to back of fabric.

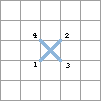
Step 2: Bring needle up through fabric at 3, insert needle at 4 and bring
through to back of fabric. Voila! You've completed a cross stitch!
Note: In the stitch diagrams above (Steps 1 and 2), the squares each
represent 1 "block" of Aida fabric. The intersection points of the lines are where the holes appear in the fabric.
What You Need To Know About ... Needles
There are many different types of needles used for embroidery. Most of us are familiar
with the traditional, blunt tapestry needle usually used for cross stitch and needlepoint, but there's a lot more to know.
Each type of embroidery demands a different kind of needle, and certain protocols can help you determine the correct size
for the stitching surface you're using, whether it's canvas, Aida cloth, linen or other evenweave, or whatever.
Summary of types of needles:
- Tapestry Needles - Blunt-tipped needles with large eyes. The larger eye enables you to thread
the needle with either yarn or several plies of thread; the blunt tip prevents the needle from splitting or snagging the threads
of the fabric or canvas. Used for counted thread work and needlepoint and occasionally for other embroideries.
- Milliners Needles - As the name implies, these were used by hat makers. They are somewhat longer
than a regular sewing needle, sharp-pointed, and have a small eye the same diameter as the needle shaft. Used for surface
embroidery techniques including Brazilian embroidery.
- Embroidery Needles - The same length and size as ordinary hand sewing needles, but with a larger
eye to handle stranded floss or yarns. These needles have a sharp point to pierce fine-weave fabrics.
- Sharps - These are the standard needles you probably learned to sew with. Available world wide,
they have a sharp point and small eye.
- Chenille Needles - These needles are the same as tapestry needles except for their sharp point,
which is used to pierce coarse or tougher fabrics.
- Beading Needles - Longer and thinner than sewing needles, these are thin needles that will fit
through the hole in small beads. Available in different sizes and long and short lengths. Used for beadwork or for attaching
beads to fabric, or to string beads.
- Twin-Pointed Needles - A relatively new addition to the needle range, these needles have a point
at each end and a single eye in the middle. Meant to be used with a stitching frame that allows use of both hands, stitchers
can avoid the twisting motions that frequently cause repetitive stress injuries. Some stitchers like them, others don't. These
are tapestry needles, meant for canvas/counted thread work.
- Easy-threading Needles - These are also fairly new. The needle eye is split at the top. The thread
is pulled down into the eye. This can be very helpful if you have trouble seeing the needle eye or have problems with dexterity.
It is nice, however, to be able to thread the needle with ease!
- Trolley Needles - A needle attached to a ring or thimble-like structure. It slips on your
finger and can be used as a laying tool to help your stitches lie smoothly on the fabric.
Tips for choosing/using needles for cross stitch and other counted thread work:
- Did you know that needles have a "right" and "wrong" side to the eye? If you're having trouble
threading the needle, try turning it around and entering the eye from the other direction.
- Choose the right size needle for the project and stitching fabric. The needle should be just large
enough to part the threads of the linen, so that there is no "drag" on the thread. If your needle is too small, it won't open
the fabric threads a bit, and the stitching thread will soon show fuzzing or wear and tear. Since this is very detrimental
to the appearance of your finished project, be sure the needle is just large enough.
- Use a needle threader. This can save a lot of time and energy, not to mention frustration,
when the threads won't pass through easily.
- For fine or detailed work, choose a shorter length needle. Some manufacturers, such as John James,
now make tapestry needles in "petite" lengths as well as normal lengths.
- Sew with thread lengths no longer than 18 inches. A 12 inch length is preferable to prevent any
signs of fuzzing or thread wear.
- Recommended Needle Sizes: Use a #22 needle for 14 count fabric or
less. Use a #24 or #26 needle for 16-18 count fabric.
In general, use a #26 needle for fabric counts higher than 18 count.
- If you use more than the recommended number of strands of floss for a particular pattern, you
may need to use a larger needle than is suggested for the fabric count.
- The higher the number of the needle, the finer (smaller) the needle.
- Needles for cross stitching are sizes 22, 24, 26, and 28.
- Use a pincushion or needlecase to keep your needles safe and readily available. A variety of cases
are available, including a magnetic variety.
- Replace needles often. They do wear out, the eyes become worn and can snag your threads, and the
finish can become worn, making the needle harder to use.
|
 |
|
|
|
 |
 |
|
What You Need To Know About...Fabrics
The selection of stitching fabrics is expanding every day! Not only will stitchers find the traditional Aida cloth in
many colors and counts, but linens and other evenweaves abound, in a rainbow of colors and special hand-dyed fabrics that
will lend a very special look to each of your stitched pieces. Whether you're a beginning stitcher or more experienced, I've
provided some guidance for you to help you choose the perfect fabric for each of your projects!
Quick summary of the different types of fabrics:
Aida Cloth - Available in many colors in addition to white and black. The threads are gathered in blocks,
creating a "block" appearance with tiny holes between the blocks, where you insert your needle when making whole or half stitches.Commonly,
Aida can be found in counts from 8 to 20 to the inch, and in addition to cotton, can be found as Aida bands or in wool.
Evenweave fabrics - Linen and many other fabrics fall into this category. The fabrics are made of linen,
cotton, acrylic, rayon, and mixtures of these. They are "single thread" weaves, which means the individual threads make a
mesh, rather than blocks. Most (but not all) stitching is done "over two," which means you make the stitch by coming up and
down over two threads. The thread count is so many threads to the inch, such as 22 count, or 28 or 36 count. The thread count
will determine how large your finished piece will be.
Canvas - An open weave fabric with threads at regular intervals, also sold in number of threads to the
inch (or holes to the inch). Used for needlepoint and also for some cross stitch or other embroidery projects.
Silk Gauze - a very finely woven fabric of evenly spaced threads of silk in a high thread count
(such as 40 threads to teh inch). This fabric works well for detailed projects stitched over one thread, rather than the usual
two threads.
Consider the purpose and final use of your project before choosing fabric:
- Will you be washing your fabric (clothing or bed or table linens)? Or will the project get heavy use?
- The background appearance of your fabric will affect the look of the finished project. If the background isn't stitched,
the fabric you choose will have a big impact on its final appearance.
- How will you use your project? Is it to be a card insert, a framed piece, a pillow front, or whatever?
- Aida fabric is more heavy duty and tough than many evenweaves. The "blocky" structure of Aida holds up well when washed,
although the sizing will wash out, leaving a softer fabric than it was originally (some of us wash the fabric before stitching,
but others prefer to work on the Aida with the sizing, as it's stiffer and has more body).
- Evenweave fabrics are a good choice for projects with unstitched backgrounds, as the even look of the fabric lends a "smooth"
look to the background. An additional bonus is that you can experiment by "painting" the background with dilute acrylic paint
washes for a very different look. Watch for my upcoming article on this topic!
- If you're planning to use your piece on upholstered furniture, as a stool cover or whatever, a tightly woven canvas will
provide durability and a nice appearance (even for cross stitch) as long as you cover the entire surface with stitches.
- Find out the fiber content of your fabric to ensure you give it the proper care. Most suppliers can give you this information
if it's not furnished with the packaging. And if the project is a gift, be sure to include washing or care information so
the recipient doesn't ruin it by improper washing or cleaning!
Some other tips:
- Stitching on linen or evenweave? The thread count is basically designed to be double that of Aida...for
example, if you're used to stitching on 18-count Aida, try 36-count linen or another evenweave. If you stitch "over two" threads,
the finished piece will be the same size as if it was stitched on 18-count Aida.
- If you're a beginning stitcher, try Aida before moving on to linen. Aida's even "blocky" structure with
holes makes for easy stitching (and you don't have to count the individual threads). Many stitchers never try another fabric,
but don't deny yourself the pleasure of holding a piece of linen in hand until you're sure you prefer Aida!
- Linen has an even thread count, but the theads don't appear as evenweave, because linen threads are "slubby,"
with little irregularly spaced bumps on the threads. This is part of what makes it attractive, but it can be a bit harder
to count the threads because of that feature.
- Doing silk ribbon work? Choose a tighter weave fabric (higher count) in a color that will show off your
beautiful ribbons. And watch for more on silk ribbons, coming soon to About Cross Stitch.
Tips for beginners:
Don't try to tackle a large project to start with.
Organise your threads, fabric, needles, scissors and hoop BEFORE you start your chosen project.
To find how large your fabric should be for your chosen design use a stitch guide then add a generous amount to this measurement to allow for framing/mounting.
Beginners will find it easy to stitch on Aida fabric. I would recommend 14 count hpi
Cut lengths of thread to about 12 inches - reduces tangles and knots
Pull the strands from the length of thread one by one to prevent tangling
Count, count, COUNT! Count your stitches often - any mistakes are easier to fix if they are
spotted early
To find the center of your fabric, fold the fabric into quarters.
Always keep the TOP half of your stitching facing the same way. Either \
or / but not both. This ensures a neat finish to your work
Start stitching the largest area of colour first. Next work the smaller blocks of colour
Backstitches are always worked LAST
Do work in a good light.
Invest in a daylight simulation bulb for working during dark evenings.
Don't pull the thread too tight. Try to keep an even tension.
Take your time. Trying to rush your project could lead to mistakes.
Use sticky Post-It notes to keep your place on a chart.
Never leave the needle in your work when putting it away. It may mark or distort the fabric.
Rolling your project around a tube when putting it away reduces creasing
If the thread gets twisted during stitching, let the needle hang down straight so that the
twist unravels itself.
Try to keep the back as neat as the front. Tangles and knots will lead to bumpy work.
To cast off, pass the needle and thread under a few stitches at the back of your work - never
knot!!
|
 |
|
|
|

